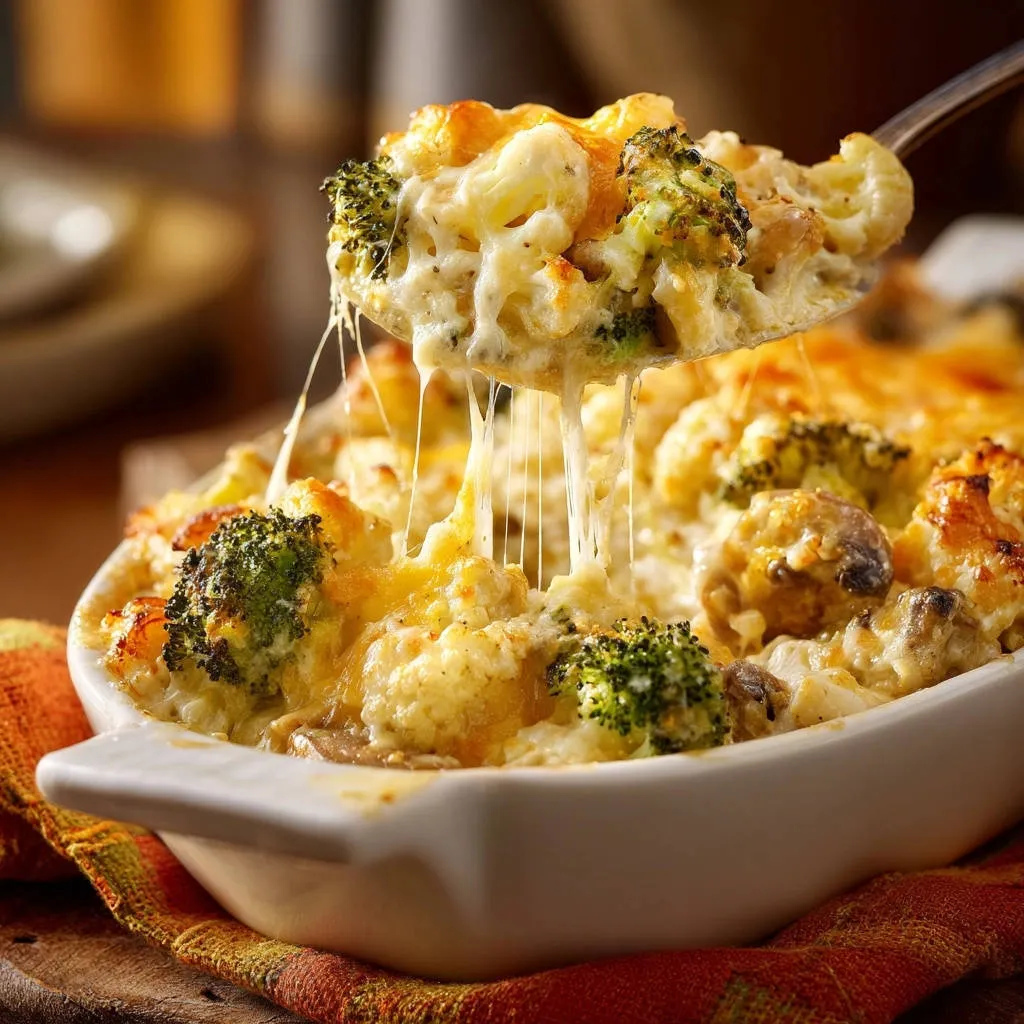
The aroma of browned butter and sharp cheddar wafting from the oven, a dish that promises both deep comfort and bright, fresh flavors – that’s the ideal broccoli cauliflower casserole. Yet, for many home cooks, this beloved classic often falls short. The common culprits? Soggy vegetables, a sauce that splits or turns watery, and a topping that refuses to crisp up. It’s a dinner-time dilemma that can leave you with a half-eaten pan and a sigh of disappointment.
Having spent decades perfecting dishes that make people ask for a second helping, I’ve seen my share of kitchen mishaps. But I’ve also discovered that the secret to a casserole that truly shines lies in a few deliberate choices made *before* it even hits the oven. Forget the heavy, sleepy casseroles of the past. This isn’t about chasing complex techniques or requiring specialized gear. It’s about understanding your ingredients, respecting their nuances, and building a dish where every element contributes to a symphony of texture and taste. From crisp-tender florets to a velvety sauce and a golden, crunchy topping, mastering this creamy, crispy broccoli cauliflower casserole is simpler than you think.
The Foundation: Why Most Casseroles Fail (and How to Avoid It)
The journey to a perfect broccoli cauliflower casserole begins with identifying the common pitfalls. The primary offender? Excess moisture. Broccoli and cauliflower, with their high water content, are prone to releasing liquid during cooking. If not properly managed, this moisture dilutes your rich sauce, turns your vegetables into mush, and prevents that desirable crispy crust from forming. It’s like trying to build a sandcastle with wet sand – it just doesn’t hold its shape.
Another frequent issue is a sauce that breaks or becomes grainy. This usually stems from incorrect ratios, overcooking the roux, or using pre-shredded cheeses coated with anti-caking agents that hinder smooth melting. Finally, a lackluster topping often results from using the wrong type of breadcrumb or not treating it with enough care to achieve a satisfying crunch.
My philosophy, refined over years in professional kitchens and applied to home cooking, is simple: focus on the small, foundational steps. These seemingly minor details are the bedrock of success, transforming a potentially underwhelming dish into one that "vanishes first" from the table.
Mastering Your Ingredients: The Chef's Selection
Choosing and Prepping Your Vegetables
- Fresh is Best, but Frozen Works: If possible, opt for fresh broccoli and cauliflower. Look for heads that feel heavy for their size, with vibrant, firm florets. When you cut them, they should snap cleanly. If fresh isn't available, frozen florets can absolutely work, but they are notorious for holding extra water.
- The Critical Cut: Cut your broccoli and cauliflower florets into small, uniform pieces. Smaller pieces not only cook more evenly but also create more surface area to cling to that delicious cheese sauce. Aim for bite-sized pieces, roughly ½ to ¾ inch. If you encounter large crowns, trim them into flat-sided bites – this ensures they sit nicely in the pan and don't roll around.
- The Golden Rule: Dry, Dry, Dry! This is perhaps the single most important step to prevent sogginess. After blanching (which we'll cover next), or if using thawed frozen florets, pat them thoroughly dry with kitchen towels. You want to remove as much surface moisture as possible. Think of it as creating a blank canvas for your sauce, free from watery interference.
Crafting the Velvety Sauce
- The Magic of Browned Butter: Don't just melt your butter; brown it lightly before adding the flour for your roux. Those toasted milk solids impart a nutty, complex flavor that complements the brassicas beautifully. It's an extra minute of effort that pays huge dividends in taste.
- The Roux Revelation: Once your butter is browned, add flour and stir constantly for *just a minute*. This brief cook time is crucial for cooking out the raw flour taste and ensuring your sauce has the proper thickening power without becoming pasty.
- Dairy Dynamics: Use whole milk or half-and-half for a rich, creamy body. A splash of chicken or vegetable broth can be added for a slightly lighter feel without sacrificing flavor.
- The Cream Cheese Secret: A small amount of cream cheese (just an ounce or two) stirred into your sauce is a game-changer. It doesn't add a discernible cream cheese flavor, but it acts as a phenomenal emulsifier and stabilizer, guaranteeing a silky-smooth sauce that resists splitting, even when reheated.
- Hand-Grate Your Cheese: Seriously, this makes all the difference. Pre-shredded cheeses are often coated with cellulose or other anti-caking agents that can make your sauce grainy or inhibit smooth melting. Grate your own sharp cheddar for punch, Parmesan for salt and umami, and Monterey Jack for its incredible melt factor. The combination offers depth and perfect texture.
Flavor Enhancers and Seasoning
- Waking Up the Cheese: A dash of dry mustard powder, a pinch of smoked paprika, and freshly cracked black pepper are your allies. These spices don't overpower; instead, they amplify the savory notes of the cheese, making the entire dish more vibrant. A tiny pinch of cayenne can add a subtle warmth if you like. Remember: you can always add more, but you can’t take it out, so taste as you go.
The Art of Assembly: Building a Casserole That Holds
Perfectly Tender Vegetables
The goal is crisp-tender, not mushy. Blanch your prepared broccoli and cauliflower florets in boiling salted water for just 2-3 minutes, depending on their size. They should still have a slight bite. Immediately drain them and plunge them into an ice bath to stop the cooking process. Once cooled, drain them again and, as emphasized before, pat them bone-dry with kitchen towels. This "blanch just enough" technique preserves their texture and vibrant color.
Constructing Your Irresistible Sauce
- Begin by browning the butter in a heavy-bottomed saucepan over medium heat until it smells nutty and has light golden flecks.
- Whisk in the flour and cook for about 1 minute, stirring constantly, to create your roux.
- Gradually whisk in the milk (and broth, if using) until the sauce is smooth and thick.
- Reduce heat to low, then stir in the small block of cream cheese until fully melted and incorporated.
- Remove from heat and stir in your hand-grated cheeses until melted and smooth. Season with mustard, paprika, pepper, and salt to taste.
The Crunchy Topping
The crumb topping is your casserole’s first impression. Panko breadcrumbs are superior here because they are lighter and create a much crispier texture than traditional breadcrumbs. Toss them with a little melted butter and, for a bright, unexpected lift, a whisper of fresh lemon zest. This small addition makes the topping sing and cuts through the richness of the cheese sauce.
Baking to Perfection: The Final Touch
Once your blanched, dried vegetables are gently folded into your luscious cheese sauce and transferred to a baking dish, sprinkle generously with your buttered Panko-lemon topping. Bake in a preheated oven (typically 375°F / 190°C) for 20-30 minutes, or until the sauce is bubbly and the topping is golden brown and irresistible. Keep an eye on it to prevent burning. If the topping browns too quickly, you can loosely tent the casserole with foil.
Once out of the oven, resist the urge to dive in immediately! Allow the casserole to rest for 5-10 minutes. This resting period allows the sauce to set properly, ensuring that beautiful, spoon-deep comfort that holds its shape and consistency.
Beyond the Basics: Chef's Tips for Elevating Your Casserole
- Customize Your Veggies: While broccoli and cauliflower are the stars, consider adding other quick-cooking vegetables like diced bell peppers, blanched asparagus, or even thinly sliced mushrooms for added complexity and color.
- Protein Power-Up: Transform this side dish into a main by adding cooked, shredded chicken, diced ham, or crispy bacon bits to the casserole before baking.
- Herbaceous Notes: Fresh herbs, like finely chopped chives, parsley, or a hint of thyme, can be folded into the sauce or sprinkled over the top before serving for a burst of freshness.
- Make-Ahead Magic: You can assemble the entire casserole (without baking) up to a day in advance. Cover it tightly and refrigerate. When ready to bake, let it come to room temperature for about 30 minutes before baking as directed, possibly adding an extra 5-10 minutes to the bake time.
- Serving Suggestions: This broccoli cauliflower casserole is incredibly versatile. It pairs beautifully with roasted chicken, baked ham, grilled steak, or as a hearty vegetarian main with a simple side salad.
There’s a reason why a well-made broccoli cauliflower casserole evokes such warmth and nostalgia. For me, it takes me back to chilly northern Utah winters, to my grandma's kitchen in Logan, where the house was already warm from baking all day and the air was thick with the scent of good food. Plates clattered, everyone talked over each other, and a single forkful could transport you. It’s that kind of dish – a celebration of simple, fresh ingredients transformed by a few mindful steps into something truly memorable.
With these chef's secrets in your arsenal, you're ready to banish soggy casseroles from your kitchen forever. By focusing on proper vegetable prep, building a stable and flavorful sauce, and perfecting that crispy topping, you’ll consistently create a broccoli cauliflower casserole that earns rave reviews and always vanishes first. Go ahead, make this comforting classic with confidence, and prepare to impress.
